|
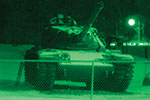
By adding a night
vision module to a digital SLR camera, night
turns into day. Follow these guidelines to
assure the best possible image quality.
|
|
Today's digital SLR cameras offer
the photographer full control of aperture, shutter speed
and ISO settings enabling the capture of excellent usable
images in low light that were not otherwise possible. However,
in many situations such as photographing scenes at night
with very little ambient light, or telephoto photography
at night at a distance, even the best digital SLR cameras
simply do not have sufficient sensitivity to capture adequate
images. In these situations, night vision modules such
as those described here are the ideal accessory. This article
provides important guidelines for producing awesome night-time
photos when using a night vision module-enabled digital
SLR camera.
Because of the increased availability of
high performance digital SLR cameras, capturing excellent
photographs at night is now easier than ever. With full control
of aperture and shutter speed settings as well as electronic
gain (ISO), the photographer has the opportunity to capture
images in low light that were not otherwise possible.
However, in many
low-light and night-time situations, digital SLR cameras
simply do not have sufficient sensitivity to capture adequate
images. For one thing, with the ever-decreasing size of
pixels, it’s remarkable
that light sensitivity has not substantially worsened with
each new generation of camera (since light sensitivity is
directly proportional to detector pixel area). But, fortunately,
there’s been a lot of camera development on noise reduction
so sensitivity has kept pace if not improved slightly with
the decreasing pixel area. Regardless of these changes, it
remains that a sufficiently long exposure time cannot be
used because either there is movement in the scene or the
camera is moving (by being handheld or on a vehicle in motion)
so long exposure times would result in blurring. For situations
such as photographing scenes at night with very little ambient
light, or telephoto photography at night at a distance, even
the best digital SLR camera will be unable to produce adequate
photographs without blur.
|

|
In
these situations, a night vision module such as those described
here are the ideal accessory (www.nightvisioncameras.com). Such
a device fits between the SLR objective lens and the camera
body and amplifies the light that is captured by the objective
lens, projecting an amplified (but entirely green) image
onto the digital camera’s image sensor. The result
is up to 10 F-stops of improvement, a dramatic change enabling
many applications that are otherwise impossible to photograph.
The module transforms moonlit or starlit scenes into bright,
high resolution images that are easily photographed. (See
box below on How Night Vision Works).
Below are some guidelines to help assure
that the Night Vision digital photos are the best possible.
back to top
|
Exposure Mode
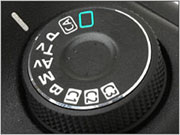 Select
Manual exposure mode (“M”). Not “Automatic”, “Aperture
Priority”, “Shutter Priority”, “Program” or
any of the other special modes. In low light, you'll
want to manually open the lens iris to permit the most
light to fall on the night vision module's sensitive
photo cathode. Select
Manual exposure mode (“M”). Not “Automatic”, “Aperture
Priority”, “Shutter Priority”, “Program” or
any of the other special modes. In low light, you'll
want to manually open the lens iris to permit the most
light to fall on the night vision module's sensitive
photo cathode.
Shutter Speed Setting
You'll want to set the camera's shutter
speed so that it is just long enough that there will
be no blur due to motion, usually about 1/30th second.
Longer exposure times will usually result in blur (for
handheld applications). Shorter exposure times may
provide some improvement if excessive motion is a concern
but could unnecessarily darken the image due to the
reduction of light being acquired from the night vision
module's image intensifier. While the output brightness
from an image intensifier increases with increasing
scene illumination, at higher scene illuminations,
the image intensifier's output brightness reaches a
maximum value and remains constant as shown in the
accompanying chart. (The limitation on the output brightness
protects troops wearing night vision goggles from being
blinded when viewing a bright light). Since this maximum
brightness is not very bright (about 2 foot lumens),
it is unlikely that the digital camera's sensor will
be saturated as a result. So, faster shutter speeds
are not necessary as a method to limit the light accumulation.
|
 |
ISO Setting
 While
back in the days of photographic film, ISO was a characteristic
that described film sensitivity to light, today, ISO
is related to electronic gain of the digital camera's
sensor. Since increasing the gain will amplify the
low light level images, even with a night vision module,
lower light scenes will become visible. However, there
are disadvantages to setting the ISO too high. As with
all electronic circuits at high gain, image noise can
degrade image quality. As such, set the camera's ISO
to a value as high as you can while still acceptable
image noise levels. Usually, the minimum value would
be 800, but some cameras deliver perfectly usable images
at ISO 1600, 3200 or even 6400 (on some recent Nikons). While
back in the days of photographic film, ISO was a characteristic
that described film sensitivity to light, today, ISO
is related to electronic gain of the digital camera's
sensor. Since increasing the gain will amplify the
low light level images, even with a night vision module,
lower light scenes will become visible. However, there
are disadvantages to setting the ISO too high. As with
all electronic circuits at high gain, image noise can
degrade image quality. As such, set the camera's ISO
to a value as high as you can while still acceptable
image noise levels. Usually, the minimum value would
be 800, but some cameras deliver perfectly usable images
at ISO 1600, 3200 or even 6400 (on some recent Nikons).
Manual Focus
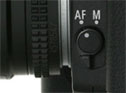 When
using a night vision module, select Manual Focus mode
(usually a small lever switch on or near the objective
lens mount). Manual focus gives you greater control
over how the focus appears. Since night vision modules
are generally grainy, the image grain can confuse the
SLR camera's focus sensors. Also, realize that these
focus sensors will be staring at the output of the
night vision module so the grainy artifacts will not
be affected by the focus position of the objective
lens (which is located on the front of the night vision
module). When
using a night vision module, select Manual Focus mode
(usually a small lever switch on or near the objective
lens mount). Manual focus gives you greater control
over how the focus appears. Since night vision modules
are generally grainy, the image grain can confuse the
SLR camera's focus sensors. Also, realize that these
focus sensors will be staring at the output of the
night vision module so the grainy artifacts will not
be affected by the focus position of the objective
lens (which is located on the front of the night vision
module).
Use Stabilized Lenses
 A
camera's image stabilization feature permits the photographer
to use slower shutter speeds without resulting in blur
due to camera shake. Note that there are two primary
techniques for image stabilization: optical stabilization
(where a small element inside the lens moves in order
to stabilize the image projected on the camera's detector)
and digital stabilization (which take advantage of
extra rows and columns on the perimeter of the detector,
shift the image an appropriate amount to stabilize
certain types of motion). Normally, the optical image
stabilizers, though more expensive, are preferable
since they better remove the blur component of the
motion. When using a night vision module, the main
disadvantage of the digital stabilization is that the
image is blurred on the input of the night vision module
resulting in some blur on the intensified output image.
So, optical stabilization is preferred. A
camera's image stabilization feature permits the photographer
to use slower shutter speeds without resulting in blur
due to camera shake. Note that there are two primary
techniques for image stabilization: optical stabilization
(where a small element inside the lens moves in order
to stabilize the image projected on the camera's detector)
and digital stabilization (which take advantage of
extra rows and columns on the perimeter of the detector,
shift the image an appropriate amount to stabilize
certain types of motion). Normally, the optical image
stabilizers, though more expensive, are preferable
since they better remove the blur component of the
motion. When using a night vision module, the main
disadvantage of the digital stabilization is that the
image is blurred on the input of the night vision module
resulting in some blur on the intensified output image.
So, optical stabilization is preferred.
|
back to top | continue
article
|
|
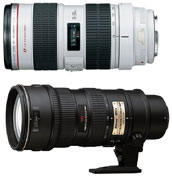
Lens Aperture
The basics still apply for night
vision intensified low-light photography. In low-light
situations, you'll want to select the fastest
objective lens set to the lowest F-stop setting. (The
lowest F-stop value indicates that the iris is opened
up fully and will gather the most ambient light possible
for that lens).
| Nikon and Canon offer fast stabilized
telephoto objective lenses that are ideal for night
vision applications. |
 |
Infrared Illuminator
Sometimes, even with a night vision
module, it’s simply too dark to obtain a good
quality photograph at night. A dark and cloudy night
with no ambient light is one example. Since the night
vision module is merely a light amplifier, if there
is no light from the stars and sky or from city lights
reflecting from clouds, the night vision module will
not be effective. In order to photograph without the
use of a flash or visible light source, a near-infrared
light source can be used that emits light that can
be seen by the night vision module but is invisible
to the naked eye. Unlike some digital camera sensors
which have some near-infrared response, night vision
modules are most sensitive to the near infrared wavelength
range and consequently these light sources can significantly
enhance the night-time image and render night photography
possible despite the lack of sufficient visible illumination.
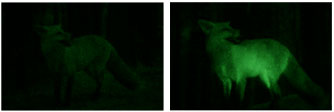
Invisible near infrared illumination
can be used to brighten scenes that are otherwise too
dark.
|
|
Image Cropping
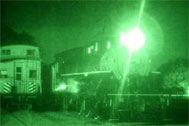 Because
image intensifiers have automatic electronic gain
features to maintain a constant light output, the
presence of bright lights in the field-of-view (such
as headlights or street lamps) may have the affect
of decreasing the unit’s overall light gain.
This is similar to back-illuminated scenes for un-intensified
photography, but even more important because of the
significant impact on light gain that could result.
This affect may cause the other regions in the image
to darken to an unacceptable level. If possible,
do your best to exclude non-important bright lights
from the field of view. Because
image intensifiers have automatic electronic gain
features to maintain a constant light output, the
presence of bright lights in the field-of-view (such
as headlights or street lamps) may have the affect
of decreasing the unit’s overall light gain.
This is similar to back-illuminated scenes for un-intensified
photography, but even more important because of the
significant impact on light gain that could result.
This affect may cause the other regions in the image
to darken to an unacceptable level. If possible,
do your best to exclude non-important bright lights
from the field of view.
Turn-off All Camera Visible/Audible
Functions
For covert night vision photography,
don’t forget to disable all camera lighting and
sound functions. (For example: disable flash, any red
eye reduction mechanisms, auto focus assist, LCD preview,
and all audible signals).
Use a Tripod
When handheld use is not required,
select an exposure time long enough that the movement
of objects under observation does not result in image
blur. As with un-intensified photography, long exposures
require that you hold your camera perfectly still to
avoid blurring. A tripod is a perfect accessory. If
one is not available, try bracing your camera against
a stationary object like a tree or wall. In order to
avoid the blur that results from finger pressing the
camera shutter release (which can cause enough movement
to blur a photo), use the camera’s timer.
|
|

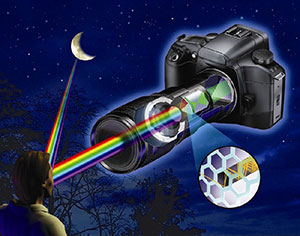
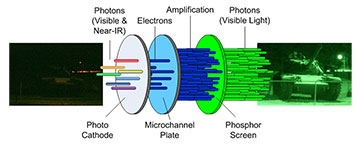 AstroScope
transforms dark scenes into bright, high resolution
images that can be easily photographed without
the need for additional lighting or longer exposure
times. The objective lens focuses the minute
amounts of available light onto the faceplate
of its internal central intensification unit
that converts the photons to electrons. The internal
electron flux is then amplified and the electrons
are accelerated so that when they impinge on
the output phosphor, a bright green image is
created. The image is then focused onto the internal
detector of the digital SLR camera.
AstroScope
transforms dark scenes into bright, high resolution
images that can be easily photographed without
the need for additional lighting or longer exposure
times. The objective lens focuses the minute
amounts of available light onto the faceplate
of its internal central intensification unit
that converts the photons to electrons. The internal
electron flux is then amplified and the electrons
are accelerated so that when they impinge on
the output phosphor, a bright green image is
created. The image is then focused onto the internal
detector of the digital SLR camera.